Sunday, October 9, 2016

3D Heraldry Shield

My Heraldry Shield
So my latest project isn't the most historically accurate but I had a ton of fun doing it, basically it's my SCA device in 3D on a shield about the size of a real shield.
 I used a wooden shield blank I purchased at Winter War in 2016 from a vendor and painted it with acrylic paint for the field (i.e. the background of the device).


 I then used polymer clay, pigments, alcohol ink and a touch of acrylic paint to make both the Narwhal and three slightly different mushrooms. For some reason the Narwhal ended up with a horn that bends upwards slightly, I think this happened when I took it out of the oven, I wasn't careful enough to keep it flat. For the Heraldry the Narwhal is supposed to be 'sable' or in common tongue black. I didn't want the Narwhal completely black so I just gave it heavy flecking as is seen in younger Narwhal (they lose colouration as they get older).

My mushrooms are supposed to be 'argent' also known as silver or white. Therefore I gave them white stems and overtop the brown I painted a coat of semi-translucent silver paint.

Here are the mushrooms on the shield 
Here is a side view to see the 3D effect
Overall, I'm quite pleased with the end result. It makes a neat impression and I'm pleased with how the elements individually turned out when put all together.

Till next time!
SaveSave

Monday, October 3, 2016

Garb Sewing Projects


I worked on two smaller sewing projects lately a smock as I desperately needed another one and an apron for doing Arts and Science projects in.

The smock above was made from the Elizabethan Smock generator online which works fairly well. I used a blend of silk and cotton for this smock and added linen lace to the neckline. It's lightweight and feels lovely against the skin. It's also pretty much see-through due to how light-weight the material is so there isn't a picture of me wearing it.
A close-up of the neckline to see the lovely linen lace
The lace I used here I purchased via etsy from Lithuania. It's gorgeous and I love the historic feel of it- perfect for the period with the beginning of lace.

My other project was a cotton apron, which I hand dyed with indigo. A little blotchy and cotton isn't period but it's perfect to protect my dress with during Arts and Science events. It started as two rectangular pieces of cloth and then was hemmed and gathered into the apron shown.

Overall not super exciting projects but satisfying anyways to get them finished.

Wednesday, September 7, 2016

Naturally Dyed Silks

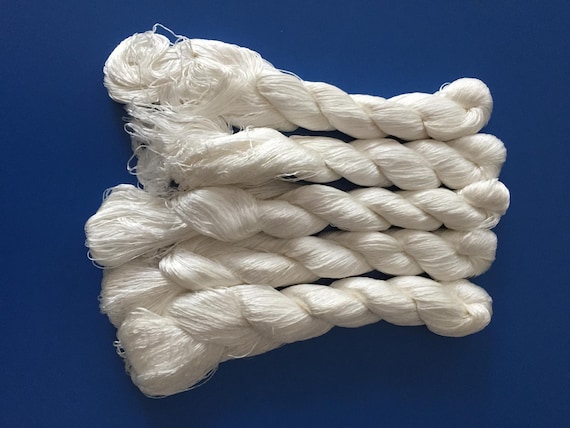
100% Silk embroidery thread- bare and ready to dye!
Source
This summer I've been doing a huge amount of natural dyeing, all in preparation for a historical arts and sciences entry into a competition called the Queen's Pick Tournament. Basically it's for people who- like me- want to make an entry, aren't too sure of the complete historical accuracy of their project or haven't entered into an arts and science competition before. As I fit both these requirements and wanted a fun new project I decided to do natural dyeing of silk embroidery threads and then use them to make a semi-historical design. This post will cover the dyed threads and another (likely in a few months once I'm finished) will cover the embroidered piece. 

I purchased my de-gummed silk from a Chinese company called Suzhou Embroidery through Etsy. The picture at the top is of the silk I bought. It was well packaged and was easy to work with despite being really fine because each skein was already divided into 20 smaller skeins and I took the time to place six figure-eight knotted strings through each small skein so it wouldn't tangle.


Across the top row from left to right: The variegated lavender is light Indigo over-dyed with Madder.
The coral pink is Madder lightly dyed. The golden-yellow is goldenrod. The copper is yellow onion skins.
On the bottom is from left to right: Phragmites tops when they reached full redness, with a couple pieces of copper pipe for a medium-dark green. Next to it is the blue-green that is light indigo over-dyed with the same phragmites and copper dye.

From Left to Right: Varigated moss is purple basil leaves with a baking soda rinse. Black-eyed susan followers for a chartreuse  green. Sea-foam is Dyer's Chamomile over-dyed with light Indigo. Teal is also Dyer's Chamomile over-dyed with medium Indigo. Next is dark blue with multiple dips of Indigo, followed by a medium blue from Indigo also.

From Left to Right: More Indigo slightly lighter in shade, and again in the lightest concentration. The grey and navy variegated silk is from black beans. Next is a greyed purple from Logwood chips with steel/iron in the pot. Then charcoal an exhaust of the same Logwood chips and steel and the medium grey the final exhaust of Logwood chips and steel. Finally is greyed-lilac from purple basil leaves with a vinegar rinse.

From Left to Right: Burgundy from Madder with a baking soda rinse, followed by an Indigo over-dye. Then a dark concentration of Madder with a baking soda rinse for a crimson. Next is Madder exhausted once from the previous also rinsed in baking soda. The middle shade is Madder in pH neutral rinsed water. Next is Madder rinsed with vinegar creating a burnt-orange. Then Dyer's Chamomile over-dyed with Madder for a tangerine shade. Cutch is on the end for a tan shade.

Lastly again from Left to Right: Mullein leaves for a butter yellow shade, Dyer's chamomile for an almost cream yellow, Tiger Lily flowers for a cream shade, Greyed-pink from Rose of Sharon flowers, and finally a brown-pink from plum leaves and fruit skin.

Overall I'm really pleased with what I've accomplished, and I plan to do a few more shades though not for the project but rather in the future. I have some lichen I want to try as well as walnut hulls and avocado skins and pits. There is quite a range of natural colours out there and it's fun to see what plants can give you.

Monday, July 18, 2016

Making a Leather Knife Sheath


The instructor's knife sheath
Recently I was at a SCA event and got the chance to make a leather knife sheath. I've never worked with leather before but I thought this was such a neat thing to give a try. For the class everyone received a steak knife and a leather piece around 3mm thick.

First the process of mapping out the design was explained to us as we were given pre-mapped out leather pieces because of time constraints. This was interesting as our instructor recommended kids foam craft sheets to do the first pattern on as they're about the same thickness of the leather and easily folded around the knife.

Our starting leather piece with outline included
Next we got to look at some designs our instructor already had mapped out for us based on extant knife sheaths as well as some other designs of period sheaths.
My favourite of the period knife sheath designs

The basic design I chose to edit
Then once we decided we could alter the design anyway we wished and get started. You can sort of see my design idea below.
Edited Design
To start it was explained to us that we needed to evenly wet the leather in order to give it flexibility and so that the design would show on the leather after we removed our traced design. He also mentioned not to press too hard and not to go over the lines more than once as you would see the uneven pressure on the leather. We also had the option of using bone carved embossing tools, which were really neat as our instructor had carved them himself.

After the design was traced we then very carefully cut the design into the leather, and if we wanted to emboss we wet the leather again and pressed them hard into leather for the design.
My cut design
Then we placed the leather into the water to wet it further and folded it around the knife. It was time for the difficult part of piercing the holes with an awl in order to sew the knife together. As a perfectionist I can easily say this is the part where I am sure I was a pain to teach as I found I didn't really have the hand strength I would have liked for the task as well as the fact that trying to line up the awl so it's where you want it on both pieces of leather was in no way as easy as it sounds. I found I did enjoy the sewing part however, and it was interesting using double needles in order to hold the leather together securely. 

Once a bit was pierced then those holes would be sewn with the knife in place the entire time- constantly re-folding the leather to ensure a good fit. Afterwards the knife sheath was wetted again and with a razor blade the excess leather cut off. 
The back of my knife, you can see the cut off leather, along the stitch line
The front of my finished knife
Overall I'm pleased with my first attempt at leather working. I'd be interested to try it again, but it definetly was something that requires patience. I'm very grateful I got the chance to try this craft out, so neat. :)

Wednesday, June 29, 2016

Trying Stained Glass


My piece against the light
I was at an awesome event on the May 24th weekend this year called Fruits of Our Labour (fondly known as FOOL) and got the opportunity to try out making stained glass. One of the best parts about the SCA is there are often classes for anything you may be interested in and often at just the cost of materials. 

A wonderfully sweet and engaging woman named Sciath Ingen Chaennaig (We referred to her as Sciath- pronounced Sky-ah) taught the class and I learned a ton. We got to pick out our patterns on paper from a wide variety of choices and price points and then dove right in after a safety talk. The talk was mainly common sense. There are poisonous things as part of the process, don't lick them. We will be melting lead, it will be hot. 
My piece against white so you can see the colours
Each person had three copies of the pattern one for reference, one to cut into the individual pieces so that the glass could be cut and one to place the wet pieces of glass on to make them fit together.

Firstly I learned stained glass takes a long long time. I estimated I spent about 10 hours on this piece (with generous help from others pitching in so I'd finish in time). You have to cut out the glass on all straight lines and chip away on the convex edges and grind down on the concave edges. Grinding takes forever and is quite messy. I was particularly glad of my glasses and I still ended up with little glass bits all in my clothes, and hair. 

Next was this neat copper sticker material which needed to be folded and smoothed onto all the edges of the glass pieces. This was actually quite soothing, and it was here you could start to really see what the final piece would look like.

Then came the flux which is this poisonous sticky liquid that all the edges of the glass needed to be coated in so that the lead would stick to the glass.

The soldering step was my favourite part. I enjoyed watching the lead melt and smooth and connect the glass together. The patina at the end to make the lead black was neat too (and also toxic).

The pieces although cut out from the pattern were surprisingly difficult to fit together, which you wouldn't think as they were cut directly from the pattern, but the slightest bit off really made a difference. 

Over all I was much more appreciative of professional and hobbyist stained glass makers at the end of the class. I don't think stained glass is the hobby for me but I do love my finished product and picking out the glass from all the amazing options was so fun- I can easily see how people could love to do this.

A picture of me very tired but happy and my new piece

What do you think? Have you tried stained glass?

Saturday, June 25, 2016

1530's Inspired Peryton Embroidery, Part Two

Progress Photo four: There is a head!
This is a continuation of my post here: Part One.

I did decide to take out the black snout marking as I couldn't figure out how to make the animal look natural if I included it.

Finished! 
In total I finished this embroidery on the 24th of June, (with many breaks where I would forget about it for some time) and officially started stitching March 5th (London Ontario's Winter War for the SCA). Not too bad time-wise for me.

For the project I used brushed cotton twill for the main fabric, cotton embroidery thread, rayon thread for the gold and polyester metallic for the silver. For the main body I used Split stitch to imitate fur, very small chain stitch for the wings to look like feathers and some satin stitch, for example on the hooves, antlers, ear, and crown.

Around this little guy will be knot-work that won't be from the same period but will be close enough that I'm making it work as the Tudor period did have knot work for decoration.

Hope you enjoyed!


Saturday, June 18, 2016

1530's Inspired Embroidery, Linlithgow Peryton


Linlithgow Fountain Peryton
 (From Pinterest)
This project was inspired by the photo above, a Peryton that is part of the Linlithgow Palace King's Fountain in Scotland.

This was inspiring first because it's a mythical critter- of which I have fondness for in all their shapes and species. A Peryton is a mythological winged deer, and I believe it's supposed to eat people. Honestly ignoring the meat-eater part I just loved the look of it. It looks soft and noble with the crown and in an alternative view of the image you can see a shield.

Secondly the deer species that this Peryton is based on is a Scottish Roe Deer. These are a small species of deer that look adorable and have odd moustache-like markings on their snout. Basically adorable.
Roe Stag in Heather
Source
Thirdly this fountain was commissioned by Mary Queen of Scots' father King James V. This is my preferred time period and country for my SCA persona. Approximately 1530s around the Hebrides and Highlands of Scotland. So this to me was proof enough that they used this type of decoration during the time period.

I started this project in March, and picking it up occasionally to work on. Here are some pictures of progress as I've continued it.
Progress photo one
Progress Photo two
Progress Photo three
I plan to have a knot work border around the Peryton and then the whole thing will hopefully go onto a belt pouch. I'll make another post with more progress photos when I finish the Peryton and likely another when I finish the knot work border.

You can now see the finished Peryton and another progress shot here in Part Two.